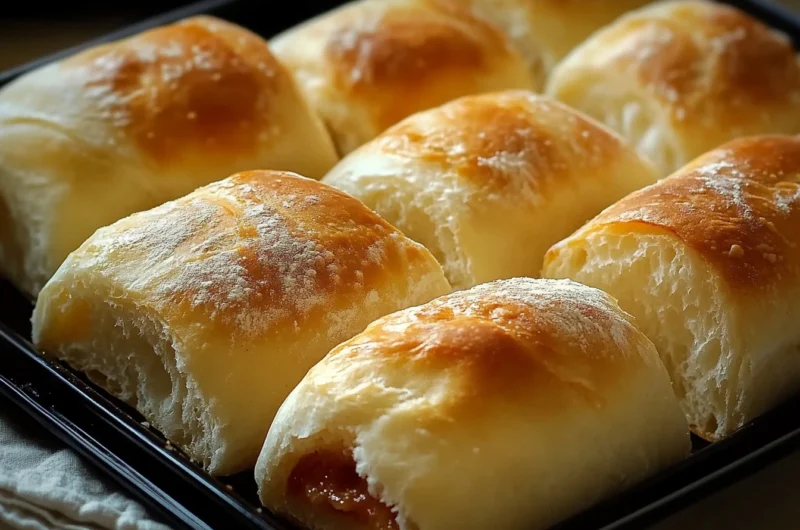
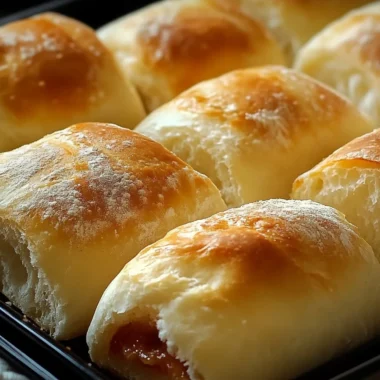
Homemade Ciabatta Rolls are a delicious addition to any meal. With their crispy crust and light, airy interior, these rolls can elevate anything from a simple sandwich to a fancy dinner party. Making your own bread at home not only fills your kitchen with the wonderful aroma of baking but also allows you to enjoy fresh, warm rolls right from the oven. This guide will take you through the delightful process of creating your very own ciabatta rolls, complete with tips, serving suggestions, and answers to all your burning questions.
Why Make This Recipe
There are many reasons to make Homemade Ciabatta Rolls. First and foremost, the taste of freshly baked bread is simply unbeatable. Store-bought rolls often lack the freshness and flavor that homemade varieties can bring. With just a few basic ingredients—bread flour, sea salt, hot water, yeast, and olive oil—you can create something truly special.
Moreover, making rolls from scratch is a rewarding experience. Kneading the dough and watching it rise can be a joyful process. Plus, sharing your creations with family and friends can bring great satisfaction. Whether you are an experienced baker or a novice looking to try something new, these ciabatta rolls will impress everyone at the dinner table.
How to Make Homemade Ciabatta Rolls
Making ciabatta rolls is straightforward if you follow the steps closely. Here’s a detailed breakdown of the ingredients and directions you will need to create these delightful rolls.
Ingredients:
- 3 cups bread flour
- ½ Tbsp sea salt
- 1 ½ cups hot water
- 1 packet active dry yeast (about 2 ¼ teaspoons)
- 2 Tbsp extra virgin olive oil
Directions:
Prepare the Dough
In a large bowl, combine the bread flour and sea salt. Whisk these two together to ensure they are evenly mixed. Next, measure the hot water and allow it to rest for a minute or two. This slight cooling will help when you add the yeast. Pour the yeast into the water and whisk for about 30 seconds to 1 minute until it is activated.
Add the yeast mixture over the flour blend, and gently mix with a spatula. You want the dough to be shaggy and sticky at this point. Finally, add the olive oil and fold it into the dough gently. Be careful not to press the dough down too much, as you want to keep the air trapped inside.
Rest the Dough
After preparing the dough, cover the bowl with a kitchen towel and place it in a warm spot, away from direct sunlight. Allow the dough to rest for 1 hour and 30 minutes. This resting period is crucial as it helps the dough to rise and develop flavor.
Fold the Dough
Once the resting time is up, uncover the dough. Gently lift the dough from the bottom and fold it over the top, repeating this process four times by folding all sides of the dough in. This step helps build the structure of the rolls.
Let the dough rest for another 30 minutes. You will repeat this folding process two more times, resulting in a total of three sets of folds with 30-minute rests in between.
Shape the Rolls
After the final folding, it’s time to shape your rolls. Lightly flour a piece of parchment paper. Carefully roll the dough out of the bowl and stretch it into a rectangle shape. Be gentle to avoid kneading or pulling from the top, as this will help keep the air bubbles intact.
Using a dough cutter, slice the dough lengthwise, then cut it into individual rolls—6 to 8 rolls depending on your size preference. Once cut, gently separate the rolls from each other and pull the parchment paper onto a baking sheet.
Final Rest and Baking
Cover the rolls and let them rest for another 30 to 50 minutes. While the rolls are resting, preheat your oven to 420°F (215°C) and place a rimmed baking sheet on the lower rack of the oven. The steam created during baking will help to achieve that perfect crust.
When the rolls have rested, uncover them and lightly spray the tops with water. Place the rolls into the oven and carefully add about ½ cup of water to the rimmed baking sheet below to create steam. Bake for 20 to 25 minutes until the rolls are golden brown.
Cooling
After baking, remove the rolls from the oven and let them cool for 1 hour before serving. This cooling time is essential, as it allows the interior to set and develop its final texture.
How to Serve Homemade Ciabatta Rolls
Ciabatta rolls are versatile and can be served in many ways. Here are a few serving suggestions:
-
Sandwiches: Use the rolls to create delightful sandwiches filled with deli meats, cheeses, and fresh vegetables. Their airy interior is perfect for holding fillings without becoming soggy.
-
Dipping: Serve them alongside soups or pasta dishes, letting guests tear off pieces to soak up sauces or broths. A drizzle of olive oil and balsamic vinegar for dipping can add a gourmet touch.
-
Grilled: Split them and grill lightly to add a smoky flavor. You can also brush them with herb-infused butter before grilling for extra richness.
-
Appetizer: Slice the rolls and serve them as crostini topped with your favorite spreads or toppings like bruschetta or paté during parties.
How to Store Homemade Ciabatta Rolls
To keep your ciabatta rolls fresh, store them in a paper bag at room temperature. Avoid sealing them in plastic, as this can create moisture buildup, making the crust soft. If you have leftovers that you don’t plan to use within a couple of days, consider freezing them.
To freeze, place the rolls in a resealable plastic bag after they have cooled completely. They can be frozen for up to three months. When you’re ready to enjoy them, simply thaw them at room temperature. You can warm them in the oven at 350°F (175°C) for a few minutes to restore their crispy crust.
Tips to Make Homemade Ciabatta Rolls
-
Measure Ingredients Accurately: Use a kitchen scale to weigh your flour and water for the best results. Precision helps create the right dough consistency.
-
Don’t Skip the Resting Time: Allowing the dough to rest and rise is crucial for developing flavor and texture.
-
Gentle Handling: Handle the dough with care and avoid excessive kneading or punching down, which can deflate the air pockets.
-
Experiment with Flour: While bread flour is ideal, you can blend in some all-purpose flour for a softer texture.
Variations
-
Herb-Infused Rolls: Add dried herbs such as rosemary, thyme, or oregano to the flour mixture for a pop of flavor.
-
Cheese-Stuffed: Incorporate small chunks of cheese into the dough during the folding stage for a gooey surprise in the middle.
-
Olive and Sun-Dried Tomato: Mix in chopped olives or sun-dried tomatoes for Mediterranean-inspired rolls.
FAQs
Q1: Can I use all-purpose flour instead of bread flour?
A: Yes, you can use all-purpose flour, but the rolls may be less chewy and have a different texture than those made with bread flour.
Q2: How can I ensure my rolls are crispy?
A: Create steam in the oven by adding water to a pan below the rolls during baking, and make sure not to cover the rolls while they bake.
Q3: Why is my dough too sticky?
A: Dough stickiness can vary depending on humidity and flour type. If it’s too sticky to handle, you can add a little more flour during the mixing phase.
Q4: Can I make the dough in advance?
A: Yes, you can prepare the dough and let it rise in the refrigerator overnight. Just allow it to come to room temperature before proceeding to shape and bake.
Making Homemade Ciabatta Rolls can be a rewarding endeavor that fills your kitchen with the delightful aroma of freshly baked bread. Whether you’re enjoying them with a meal or sharing them with loved ones, these rolls are sure to bring joy to your table. Enjoy the process, and happy baking!
Homemade Ciabatta Rolls
Equipment
- Baking sheet
- Stand Mixer
- Oven
- Dough Scraper
Ingredients
Dough Ingredients
- 1 cup warm water
- 1/2 tsp active dry yeast
- 2 cups all-purpose flour plus extra for dusting
- 1 tsp salt
- 1/2 tbsp olive oil
Instructions
- In a small bowl, mix warm water and yeast. Let it sit for 5 minutes until frothy.
- In a large bowl or the bowl of a stand mixer, combine the flour and salt. Add the yeast mixture and olive oil.
- Mix until a sticky dough forms. You can knead by hand or use a stand mixer with the dough hook for about 8 minutes until the dough is smooth and elastic.
- Transfer the dough to a lightly floured bowl, cover with a clean towel, and let it rise for about 1.5-2 hours, or until doubled in size.
- Preheat your oven to 425°F (220°C). Line a baking sheet with parchment paper or dust with flour.
- Once the dough has risen, punch it down and divide it into 8 equal pieces. Shape each piece into a rough rectangle or oval shape.
- Place the shaped dough onto the prepared baking sheet, leaving space between each roll. Let them rise for 30 minutes while the oven heats up.
- After the second rise, dust the top of each roll with flour, then bake for 20-25 minutes, or until the rolls are golden brown and sound hollow when tapped on the bottom.
- Allow the rolls to cool on a wire rack before serving.